Web Development

...now browsing by category


Use makecert.exe to generate certificates for WCF service in Windows 7/IIS7

Tuesday, September 27th, 2011

-   In order for server certificate to be found by WCF wsHttpBinding’s serviceCertificate, the certificate must be stored in LocalMachine

Notes below describe the process of creating a self-signed certificate, storing in Localmachine, import it to Trusted Root CA, and then use it to sign other certificates to be used for server and client

Generate a self-signed Certificate and Root Trust it

Steps:

  1. Launch Vs2010 Command Prompt:
    Start -> All Programs -> Visual Studio 2010 -> Visual Studio Tools -> Visual Studio Command Prompt (right click and Run as Administrator)
  2. Create a self-signed (-r), private key exportable (-pe), saving to personal folder (-ss my) under local machine (Local Computer, sr localmachine), named (-n) “YangsoftCA”,common name (-in) “Yangsoft.com”  with private key file (-sv) as “YangsoftCA.pvk” and public key file “YangsoftCA.cer”Command:

    C:\Windows\system32>makecert -r -pe -ss my -sr LocalMachine -n “CN=YangsoftCA”  -sv  “YangsoftCA.pvk” YangsoftCA.cer
    Succeeded

    Password was prompted to secure the private key file

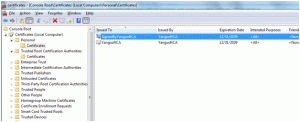
  3.  Open certificate.msc, and this certificate “YangsoftCA” appear under Local Computer / Personal store:
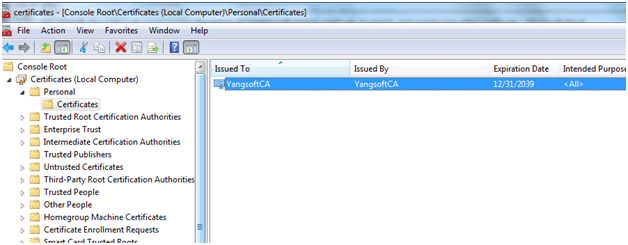
    Certificates under Certmngr.msc

    Figure 1 Certificate created by makecert.exe appears under Local Computer/Personal folder

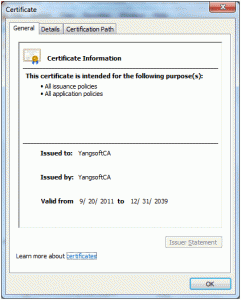
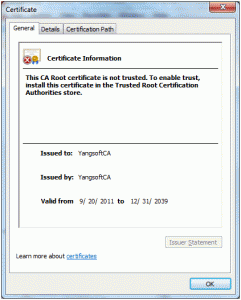
  4. We intended to use this certificate as root level certificate authority so it can be used to issue chain trusted certificates for encrypting communications between server and client, as well as authenticating web clients that are going to access the WCF service hosted on the server. At this point, when I double clicked on the certificate and opened up the property window, it said that the certificate authority was not trusted, as shown in Figure 2:

    Certificate not root trusted

    Figure 2 MMC - certificate not yet trusted

  5. To make this certificate the root of the trust chain, imported the YangsoftCA.cer file into the Trusted Root Certificate Authorities store (right-clicked on the certificate, copied and then pasted into Trusted Root Certificate Authorities) ; once I did that, now when I went back to the personal store and opened the “YangsoftCA” certificate, the status changed to “OK”, as shown in Figure 3.

    Certificate root trusted

    Figure 3 Certificate imported to Root Trusted CA

  6. Now, I can use it to issue other certificates down the trust chain.

Use the Root Trusted Certificate to Issue Chain Trusted Certificates

First, used the YangsoftCA to sign a certificate to be used on server-side; as it is to be used for the server where WCF service is to be hosted, the signed-certificate needed to be saved into local computer:

Command:

C:\Windows\system32>makecert -n “CN=SignedByYangsoftCA” -iv “YangsoftCA.pvk” -ic “YangsoftCA.cer” -pe -ss my -sr localmachine -sv “SignedByYangsoftCA.pvk” SignedByYangsoftCA.cer

Explanation of switches:

  1. The order of switches does not matter
  2. –iv and -ic: we used the private and public key files of the Root Trusted CA, “YangsoftCA” to sign this certificate
  3. –pe: make this new certificate’ private key exportable, which is saved to the file specified in –sv, “SignedByYangsoftCA.pvk”
  4. –sv: private key file of this certificate
  5. –ss: store name my=Personal
  6. –sr: store location, if not specified, it will go to “Current User” which we do not want in this case.
  7. Certificate file (or public key file): SignedByYangsoftCA.cer
  8. When this command was run, there were several prompts to enter password. First prompt was for Subject’s password (that is to protect file “SignedbyYangsoftCA.pvk”), the last prompt was for “Issuer”, which was needed to use the Issuer’s private key file, in this case, the “YangsoftCA.pvk”.

Where did it end up?

Opened the Certificates MMC, under Local Computer/Personal store, now we see “SignedByYangsoftCA”. Double click it and we can see the certificate shows as the sub level certificate under the certification path, as shown in Figure 4:

Certificate signed by Root Trusted CA

Figure 4 Certificate signed by root trusted certificate (YangsoftCA)

Assign the Certificate Signed by Root CA to Website

Now, let’s assign this certificate to the website that hosts the WCF service. There are two ways to do this. First, we can assign the server-side certificate via system.serviceModelsection in the web.config of WCF Service application, as shown in text box below:

<system.serviceModel>

<serviceBehaviors>

<behavior name=”SvcBehavior”>

<serviceMetadata  httpsGetEnabled=”true” httpGetEnabled=”false”/>


<serviceCredentials>

<serviceCertificate findValue=”SignedByYangsoftCA” storeLocation=”LocalMachine” storeName=”My” x509FindType=”FindBySubjectName”/>

<clientCertificate>

<authentication certificateValidationMode=”PeerOrChainTrust”  />

</clientCertificate>

</serviceCredentials>

<!–this line turned on logging server error that is not thrown to EventLog. Use EventVwr/Application to find more details of the behind scene error; but make sure to turn this off after debugging is done since it will impact performance–>

<serviceSecurityAudit auditLogLocation=”Application” serviceAuthorizationAuditLevel=”Failure” messageAuthenticationAuditLevel=”Failure” suppressAuditFailure=”true” />


</behavior>

</serviceBehaviors>

</system.serviceModel>

We can also install the SignedByYangsoftCA certificate to IIS and assign to the website through IIS7. In order for the certificate to be imported to IIS7, we first need to merge the private and public key files of the certificate into a single .pfx file that IIS7 is willing to receive.

Return to c:\windows\system32  and type these commands:

pvk2pfx  -pvk SignedByYangsoftCA.pvk –spc SignedByYangsoftCA.cer –pfx SignedByYangsoftCA.pfx

This merged the .pvk and .cer files into an exchangeable pfx file that can be imported to IIS7.

Install Certificate “SignedByYangsoftCA” to IIS localmachine.

  1. Start IIS7 -> Click on root folder Localhost node
  2. Double-click on Server Certificates then select “Import” from the “Action” pane to the right.
  3. Browse to c:\windows\System32\SignedByYangsoftCA.pfx; there is a place to enter password, but ignore it as this is not the password used to protect the private key file. Imported successfully.
  4. Now, go to the website where I want to assign the server certificate, click on Bindings, highlight the binding and click on Edit
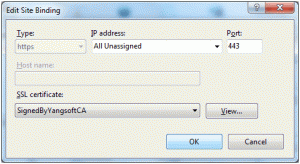
  5. You can see now the “SignedByYangsoftCA” certificate is showing in the certificates dropdown list; select it and done, Figure 5.

    Bind Certificate to website, IIS7

    Figure 5 Binding certificate to website, IIS7

Now that the certificate is assigned, you can remove theentry from the web.config file of the WCF service app and the service should still render to https without problem.

Client Certificate

  1. Configure IIS7 to require client to have a certificate to access the WCF service:
    1. Open IIS7 and drill down to the virtual folder where the WCF service is published, in this case, “Demo” directory
    2. Double click on SSL Settings (on Feature View)
    3. Check the “Require Client Certificate” and Apply.

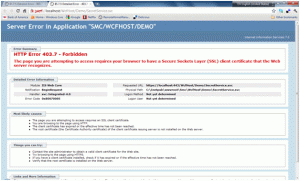
    Before a client certificate was issued, I tried to browse to the .svc file and the browser returned this message, as shown in Figure 6:

    Client certificate error

    Figure 6 If IIS7 Require Client Certificate is checked, this is client side error

  2. Now, let’s use the YangsoftCA that is already in the Root Trusted CA to issue a client certificate and then export as PFX file.Command:C:\Windows\system32>makecert -n “CN=ClientByYangsoftCA” -ss my -pe -sv “ClientBy
    YangsoftCA.pvk” -iv “YangsoftCA.pvk” -ic “YangsoftCA.cer” ClientByYangsoftCA.cer
    Explanation: generated a certificate signed (issued) by root trusted CA, “YangsoftCA”, named “ClientByYangsoftCA”, saved to CurrentUser/Personal Store, and exported private key file “ClientByYangsoftCA.pvk”.
  3. Then merged the private key and public key files into one PFX file:C:\Windows\system32>pvk2pfx -pvk ClientByYangsoftCA.pvk -spc ClientByYangsoftCA.
    cer -pfx ClientByYangsoftCA.pfx
  4. Browsed the ClientByYangsoftCA.pfx file and double clicked it, Certificate Import wizard popped up; followed the screen instruction, but ignore the password. I thought this password was the password used in protecting the private key file but when I entered it, it rejected; then I entered no password, and it took it. Is this a bug of what?

Client Certificate error – Keyset does not exist

Thursday, September 8th, 2011

A web client with Certificate called a WCF service hosted in a local machine (in development phase), secured with server-side certificate (SSL or Https:) and returned this overly simple but convoluted error, “Keyset does not exist“. What’s going on?

Well, after some readings returned from Google search, especially grateful to this two posts http://blog.mijalko.com/2008/10/wcf-iis-keyset-does-not-exist.html and http://msdn.microsoft.com/en-us/library/aa717039.aspx, this turned out to be that the “Network Service” account, which was used by the WCF service to access the resource at hosting server (even though it is just my local machine, a Windows 2003 server) did not have any permission to the private key stored in the server. That’s why the name “Keyset” – since the web client certificate only sent in a Public key and it has to matched the private key stored in the web server. So, my goal was to find the private key for this client certificate and give read permission to the “Network Service” account.

Finding the FindPrivateKey.exe was a challenge on it self, as it turned out. There might be other way to get it, but I ended up having to download a 17 MB WCF_WF sample codes package, opened the solution FindPrivateKey.sln in somewhere deep in the package and compiled it, then ran the executable using “thumbprint” switch, as shown below:

DirectoryWhereFileIsLocated>FindPrivateKey My LocalMachine -t “af 50 4e f4 3b 57 ea f0 26 a8 b0 35 bf a7 0a a7 87 ef 10 5b” -a

And it returned:
C:\Documents and Settings\All Users\Application Data\Microsoft\Crypto\RSA\Ma
eKeys\3f67f438e6678b37604ae90622d1a568_3b18c4e6-fe0f-4826-b709-bc8b80bca037.

So I went into that private key file and grant read permission to “Network Service” account; after that, I went back to the web client application, and assign the client certificate using X509FindType.FindByThumbprint option (use the thumbprint value above af 50 4e f4 3b 57 ea f0 26 a8 b0 35 bf a7 0a a7 87 ef 10 5b without spaces). Now the error disappeared and the WCF service proxy class returned to working condition.

Where to find FindPrivateKey.exe?

Thursday, September 8th, 2011

From a somewhat obscure blog here http://msdn.microsoft.com/en-us/library/aa717039.aspx, I found the source code and compiled it myself. As it turned out, this was included in a huge WCF and WF Samples download at http://www.microsoft.com/download/en/confirmation.aspx?id=21459. When it was unzipped, there were over 1200 files extracted! After that, went into folder: W:\Development\Downloads\Microsoft\WF_WCF_Samples\WCF\Setup\FindPrivateKey\CS, opened FindPrivateKey.sln and compiled it.

Then I went into the bin folder and run it like this :

DirectoryWhereFileIsLocated>FindPrivateKey My LocalMachine -t “af 50 4e f4 3b 57 ea f0 26 a8 b0 35 bf a7 0a a7 87 ef 10 5b” -a

And it returned:
C:\Documents and Settings\All Users\Application Data\Microsoft\Crypto\RSA\Ma
eKeys\3f67f438e6678b37604ae90622d1a568_3b18c4e6-fe0f-4826-b709-bc8b80bca037

Explanations of switches:

t=find by thumbprint

a=Outputs the absolute file name

Get examples of how to use FindPrivateKey from here http://msdn.microsoft.com/en-us/library/ms732026.aspx#1

Request and install client certificate – Windows 2003 server

Tuesday, September 6th, 2011

Last post was about how to request and install a server-side certificate in preparation for authenticating WCF service client using client certificate. Once the server-side certificate is in place, it’s time to get the client certificate in order. Here were the steps I took a few days ago for requesting, issuing and installing a client certificate in a Windows 2003 server machine:

  1. Went to Http://localhost:8080/CertSrv – >Request a certificate ->Browser certificate
  2. Submiited the request by following on-screen instruction (entered Name, e-mail, Company, department and chose key strength, 2048)
  3. Went into CA (Start->Administrative tools -> Certificate Authority ->Pending requests folder
  4. All tasks -> Issue and issued the client or browser certificate.
  5. Went into Issued Certificates folder and double clicked on the certificate request item ->Details – >Copy to file, the “Welcome to the Certificate Export
    wizard” pop up, Next and chose “Based-64 encoded X.509 (.Cer) option, same as the server-side cert created previously, Next
  6. Copied to c:\ClientCert.cer, Next and “Completing the Certificate Export wizard” showing “File Name, Export Keys (No), Include all certificates in the certification path (No), File format (base64-coded X.509)”, Finish
  7. Went into c:\ClientCert.cer and double clicked to open the Certificate – >Install certificate – >Next – >”Automatically select a certificate store,..” -> Next -> Finish

Request, Issue and Install a server-side certificate – Windows 2003 server/IIS6

Tuesday, September 6th, 2011

To use client certificates for authentication, first need to install a server-side certificate. The steps here were what I took to Request, Issue and Installed a server-side certificate for certificate auhtentication with Microsoft certificate Services and IIS6 in Windows 2003 environment:

  1. IIS6->Websites->Default website (at this point, verify the CertSrv is shown in as a Virtual directory under this site) – > Right click on Default website node and selected Properties ->Directory Security ->Server Certificate.
  2. If there is no certificate already installed on the server, click on Create New Certificate; as I already had certificates installed on my local machine, the only options at this point are “Renew the Current certificate”, “Remove the current certificate”,”Replace the current certificate”, “Export the current certificate to a .pfx file”, and “Copy or Move the current certificate to a remove server site”.
  3. For this project, I chose “Renew the current certificate“, and next
  4. Chose “Prepare the request now, but send it later” (default option) and next.
  5. Certificate request file name: leave as default at c:\certreq.txt
  6. Open the c:\certreq.txt file and copied the content to clipboard.The content is a big chunk of mumble-jumble ASCII letters like these: “—–BEGIN NEW CERTIFICATE REQUEST—–MIIDTDCCArUCAQAwcTELMAkGA1UEBhMCVVMxEDAOBgNVBAgTB0Zsb3JpZGExDjAM
    BgNVBAcTBVRhbXBhMRcwFQYDVQQKEw5CaXNrIEVkdWNhdGlvbjEQMA4GA1UECxMH…
    —–END NEW CERTIFICATE REQUEST—–“
  7. Now I went to http://localhost:8080/CertSrv and a page titled Microsoft Certificate Service came up (I had trouble to open this page from http://localhost/CertSrv initially but then realized my default website is not in http://localhost; rather my default website is configured to run from port 8080 instead of the default 80).
  8. Click on Request a certificate and select submit an advanced certificate request on next page
  9. There are two options on next page: “Create and submit a request to this CA.” and
    Submit a certificate request by using a base-64-encoded CMC or PKCS #10 file, or submit a renewal request by using a base-64-encoded PKCS #7 file. “, selected the second one.
  10. Now paste the content from clipboard to the Base-64-encoded certificate request (CMC or PKCS #10 or PKCS #7) textarea or I could use the “Browse for a file to insert” feature. Then clicked Submit
  11. If submitted successfully, the next screen said, “Your certificate request has been received. However, you must wait for an administator to issue the certificate you requested..Please return to this web site in a day or two to retrieve your certificate.”
  12. Now I went to the CA MMC (Start – >Administrative Tools -> Certificate Authority) and I saw the request sitting under the “Pending Requests” folder. I right clicked on the request and Issued it (All Tasks -> Issue) and the request moved to Issued Certificates” folder
  13. Next step was to copy certifcate to a .cer file. To do that, double clicked on the Requested certificate to view it, clicked on Details tab and Copy to a file. On “Export File Format” selected the “Base-64 encoded X.509 (.Cer) and saved to “c:\ServerCertificate.cer”
  14. Now I went into IIS6 ->Default website->Properties ->Directory Security -> Server Certificate ->Next – > select “Process the pending request and install the certificate” and opend the “c:\ServerCertificate.cer” file from “Process a Pending reqeust” screen
  15. Next screen asking about “SSL” port, leave it as default 444 and clicked Next, Next and Finish.

To verify that the server-side certificate was installed successfully, I went back to IIS6, picked a virtual directory, for example, “WcfSecure” and open “Properties” window->Directory Security->Edit (Under Secure Communication) and checked “Required secure channel (SSL), and for client certificates, selected “Accept client certificates” for now; then I browsed to a .svc file without https, such as http://localhost:8080/WcfSecured/Demo.svc; at this point I got browser error message asking me to add https to the address; so I changed to https://localhost:8080/WcfSecured/Demo.svc (or can be demo.aspx or demo.ashx page), and as expected, now the page showed correctly. That confirmed that the server-side certificate had been installed correctly. Next is to request and issue a client certificate so we can authenticate WCF Service client.

Install Microsoft Certificate Service

Wednesday, August 31st, 2011

I am in a project that requires me to use client certificate to authenticate web users who make request to using my WCF service hosted in a SSL secured website. During development phase, I just want to be able to test out the proof-of-concept, so I need to be able to self-request client certificates and grant them using localhost Certificate Authority (CA). The first step is to install the Microsoft Certificate Service on my local machine, a Windows 2003 Server. Here were the steps I went through to get this done:

  1. Went to Start->Control Panel -> Add/Remove Programs – > Add/Remove Windows Components
  2. Checked the “Certificate Services” and clicked Next
  3. CA Type: there was only two options enabled: “Stand-alone root CA” and “Stand-alone subordinate CA”.
    The two Enterprise level CA were grayed out probably due to that my machine is not an actual Domain Controller. I left the default option “Stand-alone root CA”
    alone and clicked Next
  4. CA Identity: I entered my machine name to the “Common name for this CA” box, and moved on.
  5. Next screen is “Certificate Database Settings” and just leave everything as it is (Certificate database:
    c:\windows\system32\CertLog, Certificate Database log: ibid, Shared folder: C:\CAConfig) and clicked on Next
  6. At this point, I was prompted with a Windows message “To complete the installation, certificate Services must temporarily stop the
    Internet Information Services. Do you want to stop the service now?”, answered Yes
  7. Well, then I ran into the screen that asked for Windows Service Pack 2 CD”, changed location to c:\I386 and it went through.
  8. Another Message box about enabling ASP on IIS popped up, clicked Yes, and the installation was completed successfully.
  9. To verify the CA is installed correctly, go Start->Administrative Tools ->Certificate Authority and the CA MMC should come up showing local machine as root and four folders named “Revoked Certificates”, “Issued Certificates”,”Pending Requests” and “Failed Requests”. In the next post, I will cover the steps I went through to submit Certificate requests that will be showing under the “Pending Requests” here

Reference: http://www.ehow.com/how_5143670_install-microsoft-certificate-services.html

Created a self-signed certificate for WCF development – Windows 2003

Tuesday, July 12th, 2011

During the development of a WCF app, I needed to issue a self-signed certificate to my local Windows 2003 server in order to test out ways to secure WCF server-client communication. For IIS6 this was a bit trickier than IIS7. I needed to download the IIS6 resource tool kit and then run selfssl.exe to create the certificate. IIS7 could do it right on its GUI. Here were the detail steps that I went through to create a SSL-enabled hosting environment (via certificate) on my local development machine (credited this very useful posting here):

  1. Downloaded IIS6 resource kit from here http://www.microsoft.com/download/en/details.aspx?displaylang=en&id=17275 and installed it.
  2. Start ->All Programs -> IIS Resources-> SelfSSL
  3. This launched into command line:C:\Program Files\IIS Resources\SelfSSL>selfssl /N:CN=localhost:8088 /K:1024 /V:365 /S:437690215 /T
    Explanations:

    • localhost:8088 – this is where the https site is to be hosted; as port 80 already taken by another web host, I used 8088 for the new site;
    • /K: is the key size – 2048 is recommended (but 1024 worked for my case);
    • /V: days of validity – 365 is recommended (I actually used 730 or 2 years for development convenience)
    • /S: number for your web site identifier in IIS (437690215 is site id for Wcfhost, default website usually is 1, found it under the root of the website property)
    • /T makes the certificated trusted
  4. Answered “Y” at the next prompt.
  5. The message:”The self signed certificate was successfully assigned to site 437690215″
    Go back to IIS6 and now there is a Certificate under the Directory Security

For creating a self-signed certificate in IIS7, follow this article at MSDN. http://msdn.microsoft.com/library/ff406125.aspx

Smtp mail problem at Winhost (solved)

Tuesday, June 28th, 2011

When I tried to send email from my main site hosted at Winhost.com, I got this permission error: “Request for the permission of type ‘System.Net.Mail.SmtpPermission, System, Version=4.0.0.0, Culture=neutral, PublicKeyToken=b77a5c561934e089′ failed..”. Winhost support forum has responded to this problem and suggested adding “<trust level=”Full”> under the <system.web> in web.config. I did that and the problem went away.

Thanks to folks at winhost support forum, I was also able to call Winhost smtp client, using Network credentials given to my hosting account, directly from my development local machine and sent email out by port 587. This sample code at Winhost KB was the right place to get start with Winhost smtp mail: http://support.winhost.com/KB/a650/how-to-send-email-in-aspnet.aspx.

Moved to Winhost

Thursday, June 23rd, 2011

Finally got fed up with the slowness of WP hosting at Godaddy, I decided to move my WP blog there to winhost. Yeah, Godaddy has many features that are powerful and convenient, but that exactly was my problem with them – there are too many flashy features that crowded the site and slows down the UI experience. It was easier to install WordPress and/or other open source apps on Godaddy as they are collectively located and a few button clicks was all it needed. But once my blog was setup, browsing to it was a pain and sometimes even showed time out error.

Winhost is a million mile apart from Godaddy’s flashy world. It is simple, clean and down to earth, and the price is right too. Although at the beginning I felt frustrated for lack of custom tools but then I figured out everything I needed can be found in Forum or/and KB. I first relocated my main site yangsoft.com which is in ASP.Net 4.0 and the site is already loading 10 times faster. I have been using WordPress for my blogs since early 2010 and liked it a lot, so I wanted to transfer the old blogs from Godaddy to Winhost. The way to do it seemed to be backing up mysql db from Godaddy, download it to local drive, then use Mysql Workbench to open the sql file and execute it against the newly created mysql db on Winhost server. It seemed to be working but when I browsed to the blog.yangsoft.com at Winhost, the links on right side-bar always want to point back to my old site at Godaddy. If I cannot fix this in next day or so, I will just resolve to the old fashion way – copy and paste.

At this point, I installed WordPress from scratch to yangsoft.com/blog and the installation process was very smooth and clean. Just followed the instruction given by Winhost forum at http://forum.winhost.com/showthread.php?t=5198

Manipulate master page from content page

Thursday, April 14th, 2011

I have a admin.master master page that is shared by several content pages. On the master page, I have a set of side-bar menus that get loaded dynamically from a xml file via a WebuserControl, this part of codes look like this:

<div id="LeftSideMenu" style="height:100%;">

<uc3:SideMenuXml ID="mnuCalendar" runat="server" MenuName="Calendar" />           <uc3:SideMenuXml ID="mnuUser" runat="server" MenuName="User" />

</div>

In the SideMenuXml.ascx, codes behind load xml content properly based on the MenuName which corresponds to a segment in the xml file that looks like this:

<Sidebar>

<Calendar>

<Name>School Calendar</Name>

<Url>student/SchoolCalendar.aspx</Url>

<Description>View school calendar</Description>

<DisplayOrder>1</DisplayOrder>

<Roles>Public</Roles>

</Calendar>

</Sidebar>

This has been working great, but sometimes I want a different set of side menus loaded into admin.master based on the purpose of the content page. Today, I learned that this can be accomplished by these steps:

  1. Create a public property in the master page, named “PageType” or whatever
  2. To access this property of master page, I needed to add this attribute to the content page, <%@ MasterType VirtualPath=”~/Admin.master” %>
  3. Then on the Page_Init event of my content page, I set this property to an enum value I wanted: protected void Page_Init(object sender, EventArgs e)    {        Master.PageType = MasterPageTypes.Contest;
    }
  4. Then on the admin.master I added this line of server-client-mixed code:
    <div id="LeftSideMenu" style="height:100%;">
    <% if (PageType== MasterPageTypes.Contest) {%>
    <uc3:SideMenuXml ID="mnuContest" runat="server" MenuName="Contest" />
    <% } %>

With that, I accomplished the goal of showing certain Contest related side menu for those content pages that set the PageType property of admin.master master page.

To sum it up, public property of master page is not accessible from its content page until you add this MasterType directive to the content page that uses the master: <%@ MasterType VirtualPath=”~/Admin.master” %>